 |
Guitar Lessons that work!
A Visual Learning Experience, Lead Guitar Made Easy
Includes Over 150 online guitar lessons - Become a member today!
Welcome to Guitar Secrets
Guitar lessons that work!

[C major modes] [ C Ionian ] [ Dorian mode ] [ Phrygian mode ] [ Lydian mode ] [ Mixolydian Mode ] [ Aeolian mode ] [ Locrian mode ]
[ Basic major scale fingerings ] [ F major modes ] [ G Modes ] [ Constructing Scales ] [ Key Signatures and constructing major scales ] [ Modulation, cadence, progressions ]
Playing guitar scales in one position.
Learn how to play guitar scales using 4 different fingering patterns
In the last lesson you were asked to construct four different major keys. The four keys you were asked to construct are the keys of C major, G major, D major and A major. I mentioned that once you constructed these major keys, we would learn 4 basic fingering patterns to play each of these major keys in one position. We will now call this position the II position. Before we play these scales, we need to learn a little about the four different fingering patterns.
The patterns will be illustrated as Type 1, Type 2, Type 3 and Type 4. Each of these patterns will start on a different finger. But each of these patterns will be played in this II position. Meaning, you will now play C, G, D and A major in one position, but use 4 different fingering patterns. The first position will be called the Type 1 position and will be explained below.
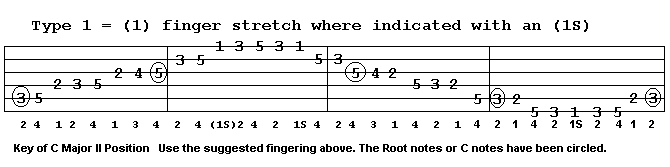
- Type 1. This fingering pattern starts with the 2 finger and utilizes the 1 finger stretch. The 1 finger stretch will be represented as 1S. All of the notes will be played in position with the exception of the 1 finger stretch.
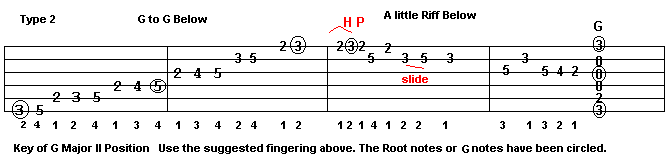
- Type 2. This fingering pattern enables you to play all of the notes of the major scale without going out of position. The scale starts with the 2 finger and every note can be played in position.
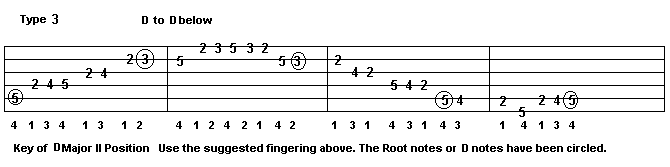
- Type 3. This fingering pattern enables you to play all of the notes of the major scale without going out of position. The scale starts with the 4 finger.
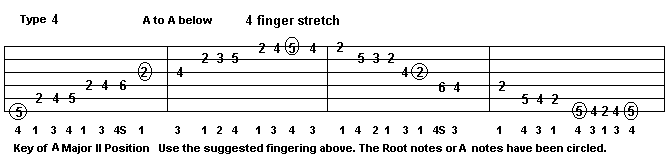
- Type 4. This fingering pattern starts with the 4 finger and utilizes the 4 finger stretch. The 4 finger stretch will be represented as 4S. All of the notes will be played in position with the exception of the 4 finger stretch.
Each scale will be started on the root note of each scale. For example, start on the C note for the key of C major. You should have each major key constructed from the previous lesson before starting these examples. Have the forms filled out and begin to memorize every note you play. Begin to memorize how the chords fit over each scale you're playing. For example, you should know that the notes of the C chord are C E and G.
Practice this guitar scale until you have it memorized. You can use this same fingering pattern to play other scales too. By moving this pattern down two frets, you can play the key of D major. Start on the D note 2 finger, A string 5th fret and play the same pattern above. Start on the E note 7th fret 2 finger and play the key of E major. Get use to this pattern and play it smoothly and without looking.
The illustration below shows the key of G major guitar scale played at the 3rd fret G note. The first two measures play from G to G, covering two octaves. The next two measures illustrates a practice riff. It is very important that you play the first two measures both ascending and descending. Use the same fingering pattern to accomplish this.
You can play this fingering pattern all along the Low E string. These examples are great to use for guitar exercises. The note on the Low E string will determine the major key. If you move this pattern to the 5th fret, you can play the key of A major. If you move it to the 8th fret, it would be C major, 10th fret D major, 12th fret E major and so on. So far we have covered the key of C major and G major in the II position. This means you can use the 2 fingering types to play C and G in this position. If you moved both of these patterns down two frets, you could play A major and D major.
Practice each of these guitar scale examples and once you get them memorized mix up the notes and begin to join them together.
Guitar Secrets
Copyright 1998 - 2018 Guitar Secrets Inc. All rights reserved
Lead Guitar Made Easy, A Visual Learning Experience
No part of this work may be reproduced without the permission in writing from the publisher