 |
Guitar Lessons that work!
A Visual Learning Experience, Lead Guitar Made Easy
Includes Over 150 online guitar lessons - Become better today!
Welcome to Guitar Secrets
Guitar Lessons that work!

Guitar lesson 1 Guitar Lesson 2 Guitar Lesson 3 Guitar Lesson 4 Guitar Lesson 5
[ Sharps and flats ] [ Guitar Tablature ] [ Guitar Exercises ] [ Guitar Tuning ]
This guitar lesson explains how to read and use guitar tablature. Guitar tab is used in place of music notation.
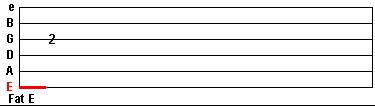
Guitar tablature instruction: A six line staff that represents the guitar fretboard. When reading tablature, numbers indicate which fret you play. Each line equals the guitar strings.
When you read guitar tablature, the lines above represent each string on the guitar. Look above and notice each string and its placement. The red line above shows the Low E string which is the fattest string on the guitar.
Illustration 2
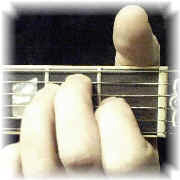
You do not have to use your middle finger, you can use your index finger if you like.
Look at the the first tablature example above. This tab box above has the number 2 which represents the second fret, on the 3rd string. Play the 2nd fret G string�Illustration 2 now. The note you just played is the A note.
Look below for another example of illustration 2. Each line in tablature represents each of the guitar strings. The numbers on each line or string is the fret number you play. So, the illustration below has the number 2 on the G string, this means you play the note at the 2nd fret G string. This would be the A note.�
e-------------------skinny E string
B-------------------
G----2-------------play the note on the 2nd fret G string.
D-------------------
A-------------------
E-------------------Fat E stringThe next illustration below shows a 12 on the first string E and a 12 on the second string B. Both of these notes are played together at the 12th fret E and B string. Play both of those notes together. These two notes are the E note and B note. Recall that I stated all notes repeat after 12 frets. Look below for an example of these two notes.
e-------12-----------skinny E, this is showing the note on the 12th fret.
B-------12------------this is showing the note on the 12th fret on the B string.
G-------------------
D-------------------
A-------------------
E-------------------Fat E stringThe illustration below has the E major chord illustrated.
E Major Chord Listen Look below and notice how the E chord would be displayed in tablature. Since all the notes below are lined up on top of each other, they would be strummed together.
e -------0-------------skinny E string, 0 means leave open, don't fret but strum.
Look below and notice how the A minor chord would look like in tablature.
B -------0-------------The 0 means leave open, don't fret, but strum.
G ------1--------------note on 1st fret, G string
D ------2------------- note on 2nd fret, D string
A ------2------------- note on 2nd fret, A string
E ------0--------------Fat E string, don't fret but strum.e -------0-------------skinny E string, don't fret, but strum.
B -------1------------- note on the 1st fret, B string.
G ------2--------------note on 2nd fret, G string
D ------2------------- note on 2nd fret, D string
A ------0------------- don't fret, but strum.
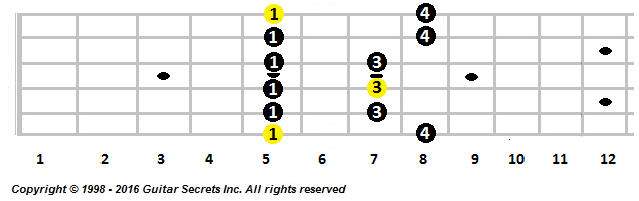
E --------------------Fat E string, don't fret but strum.The next Illustration below is that famous A minor pentatonic scale again. This time it is shown in tablature and also in the Root Note Position 5th Fret. In the last lesson, I had you working on the A minor pentatonic scale with the fingers highlighted. This time in the image below, the frets are numbered on each string. I stated earlier that it is important to learn the fingering pattern system. The reason for this is because eventually we will only be showing the numbers representing the frets on the strings and not the fingers to play each note of the scale. You will eventually have the fingering for each scale memorized anyway.
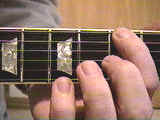
Look at the image below and notice how it starts on the Low E string 5th fret. In the image below the index finger is playing the note on the Low E string at the 5th fret. This first note would be the first 5 or 5th fret below.
The numbers below the strings are the fingers that play the notes through the scale, look to the left and notice what number equals each finger. The scale above is the same scale as below. The image above is shown in guitar tablature.
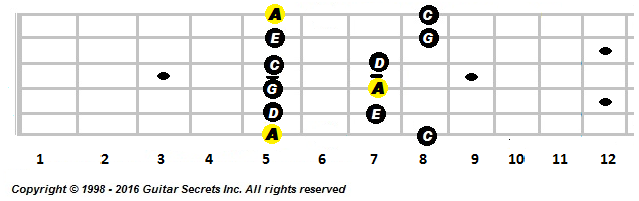
The numbers on each string represent the frets and strings being played.
Look how it starts at the 5th fret low E string and works its way through all the strings, then ends on the high E or 1st string 8th fret. ListenWatch a Video playing this scale
Each finger
The illustration below shows the same A minor pentatonic scale in the root note position. You should have this fingering pattern memorized.
1 = Index
2 = Middle
3 = Ring
4 = Pinky
The fingers used to play this scale are: 1-4, 1-3, 1-3, 1-3, 1-4, 1-4
Here's a sample lead using the Am pentatonic root note fret position. Notice how it starts on the A note 7th fret, play this over the Am chord. The numbers under the lead are the suggested fingering pattern to use.We still need to practice some finger exercises and understanding guitar tablature will make the exercises that much easier to work on. Don't worry if you don't have the A minor pentatonic scale in the root note position memorized we will be working on it again. Finger exercises
We still need to practice some finger exercises and understanding guitar tablature will make the exercises that much easier to work on. Don't worry if you don't have the A minor pentatonic scale in the root note position memorized we will be working on it againFinger Execises
Good luck,
Guitar Secrets
Copyright 1998 - 2018 Guitar Secrets Inc. All rights reserved |