 |
Guitar Lessons that work!
A Visual Learning Experience, Lead Guitar Made Easy
Includes Over 150 online guitar lessons - Become better today!
Welcome to Guitar Secrets
Guitar Lessons that work!

Guitar lesson 1 Guitar Lesson 2 Guitar Lesson 3 Guitar Lesson 4 Guitar Lesson 5
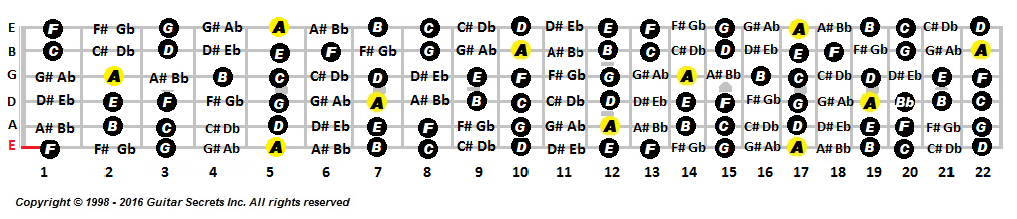
[ Sharps and flats ] [ Guitar Tablature ] [ Guitar Tuning ]Guitar fretboard notes and strings.
Learn all the notes on the guitar with easy colorful illustrations of the fretboard.
The image below, is a picture of the guitar fret board and strings. To understand how this diagram works, you need to hold your guitar out in front of you. The strings on the guitar should be directed towards your face. This view should be the exact view that the image below depicts. Look at the image below and visualize, that this picture is your guitar facing you. There’s also a video, at the bottom of this lesson to help you understand the basics.
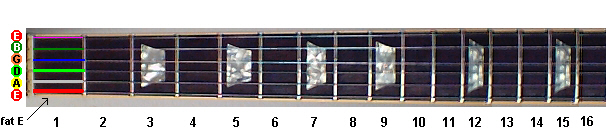
You may have noticed that there are dots or inlays on the face of the guitar fret-board. Each dot, represents the different frets on the guitar, look below. The first dot is on the 3rd fret, the second dot is on the 5th fret, the third dot is on the 7th fret and so on all the way up the fret board. Most guitars will have these dots, but some may not. These dots are very beneficial and can be used to quickly identify the location of each fret as you’re playing. You might be playing lead guitar and need to quickly jump to the 7th fret, you will know that the 3rd dot or inlay is on the the 7th fret. The dots are also at times located on the top edge of the fret-board, check out your neck. When you’re jamming away, you can see these dots on the edge of the neck and jump to the fret you need without looking at the fretboard.
The numbers that I’ve included below the fret-board, are for quick reference for each fret and are numbered 1 through 19. Count the frets on your guitar, some guitars may have as many as 24 frets. Only 19 frets have been shown on the image below. Just a quick secret, all notes on a string repeat every 12 frets. Every scale pattern also repeats ever 12 frets as well. We will learn more about this subject later as we progress through the lessons.
Look at the image above and find the strings, E A D G B E. These are the 6 strings that make up the guitar. Notice that the thickest string is red and we call that string the Fat E. Colors will be illustrated on some images to help learn the strings and with placement of the notes to the particular string. Each of the 6 strings should be memorized. You may have noticed that there are two E strings? One is the Low E, which is the Red E and is the thickest string, look above. The other E string is the high E string, which is the thinnest string; check that string out. Look at the 12th fret on the image above. Notice that I’ve included the notes on the 12th fret. Those are the same notes as the 6 open guitar strings, 12 frets lower. Its important to remember that all notes repeat after 12 frets.
Each string is at times referenced by number in our lessons. These numbers are standard throughout the industry and are listed in the table below as follows:
1st string High E string Thinnest 2nd string B string 3rd string G string 4th string D string 5th string A string 6th string Low E Thickest
- You should now know the 6 strings on the guitar are: E A D G B and E. Say them out loud and remember them.
- You should know that there are 2 E strings. The thickest or fattest string is the Low E string and the thinnest is called the high E string.
- You should know that all notes repeat after 12 frets.
- You should know what the dots or inlays are used for other than looks
- You should have printed out the blank fret-board illustrations to complete the up coming assignment.
- Watch the video below. Once you’ve completed this lesson, move on to lesson 2.
- Go to Guitar Lesson 2 covering the guitar fret-board notes.
It’s vital to know every note on the fret board and that will be covered in the next lesson. Here’s a link to the blank fret-board illustrations of the guitar fret board, you will use these illustrations to fill in all the notes of the fret-board. Click on the blank illustration link above, print out these illustrations and have them handy to fill in each note as you stChe following lessons.
Good luck,
Guitar Secrets
Copyright 1998 - 2020 Guitar Secrets Inc. All rights reserved |