

Copyright 1998 - 2018 Guitar Secrets Inc. All rights reserved |
 |
Guitar Lessons that work!
A Visual Learning Experience, Lead Guitar Made Easy
Includes Over 150 online guitar lessons - Become better today!
Welcome to Guitar Secrets
Guitar Lessons that work!

Guitar lesson 1 Guitar Lesson 2 Guitar Lesson 3
Guitar Lesson 4 Guitar Lesson 5 Guitar Lesson 6 Guitar Lesson 7
[ Sharps and flats ] [ Guitar Exercises ] [ Picking Exercise ] [ Guitar Tablature ] [ Guitar Tuning ]
Now we need for our picking hand to get the fretting hand in shape. To make things easier to understand, each fretting finger will have a number assigned to it.
1 = Index finger
2 = Middle finger
3 = Ring finger
4 = Pinkie
T = ThumbLook above and check out each number and the fretting finger that it represents. Hold your hand out in front of you and count out each finger and memorize each of numbers. This is one of the most important things to learn. You will learn to use these numbers to play scales, lead guitar and guitar chords.
In our last lesson, we worked on some picking exercises and we only used the picking hand. Now we need to put the fretting hand to work and teach it to work properly with the picking hand. These exercises will help with your dexterity and strength.
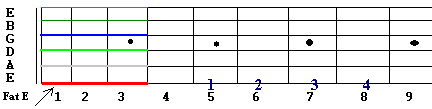
The illustration below, represents a picture of your guitar fret-board. There are a total of 9 frets on this image, those frets are numbered 1-9, count out those nine frets. There are also 4 numbers, (1 2 3 4) on the Low E string, look at the those numbers. The (1 2 3 4) numbers on the Low E string, represent the fingers you will use to play this exercise on that particular string.
1 = Index finger
2 = Middle finger
3 = Ring finger
4 = Pinkie
T = ThumbThe first note, is played on the Low E string, with your 1 finger on the 5th fret. The next note is played with your 2 finger, on the Low E string, on the 6th fret. Then the 3 finger, at the 7th fret and finally the 4th finger, on the 8th fret.
You will need to press down firmly to get the proper sound of each note. It might take some time for each of your notes to sound cleanly. These exercises are a must to get those fingers in shape. You might also want to make sure your guitar strings are not too heavy. You can purchase light gauge strings or even medium strings to make pushing down the strings a little easier. I’ve found that a classical or flamenco guitar, with nylon strings, really works well for playing fingering exercises. But, those type of guitars are not made to use a pick. I actually borrowed a classical guitar from my brother and he said, “make sure you don’t use a pick”. Well, that really helped me start to pick notes without a pick and it made me come up with a new style. It also made me start using arpeggios and such.
The tablature has been illustrated below and it represents the example shown above. You may need to go review the tablature lesson and watch the video.
Each of those lines below are the strings of your guitar. The low E string has be identified, look at the red E below. The Low E string has the numbers (5 6 7 8). The 5 = the 5th fret, 6 = 6th fret and so on. Play the 5th fret, low E string with your 1 finger. Play the 6th fret with your 2 finger. Play the 7th fret, 3 finger and so on.
Watch the video and practice this exercise until you can play it smoothly.
Try the example below and start with your 4 finger on the 8th fret.
When you get real comfortable, start on a different fret, move all over the fret-board. Have your guitar fret-board note illustration handy and check out the notes you’re actually playing.
Assignment:
Good Luck,
Guitar Secrets
Copyright 1998 - 2018 Guitar Secrets Inc. All rights reserved |