


In our lessons, colors will be used to represent notes on the guitar fretboard. Look below and notice the colors we will use to represent each note. A note is a tone of a certain pitch which can be created in a number of different ways. For example, if you were to push down a single key on the piano, you would be playing a note. To play a note on the guitar, you would fret or push down on a string to create a tone of a certain pitch. In this lesson we will learn where each note is located on the guitar fretboard.
The image below illustrates a guitar fretboard and shows all the notes along the Low E string. The low E string is the largest string and will be in red. The color for the strings will be slightly different than the color for the notes. The high E string, is the thinnest string, look below.
| C | D | E | F | G | A | B | C |
The notes and each color have been illustrated in the table above. We will use each of these colors to represent each of these notes in our lessons. There will be twelve different notes we need to learn on the guitar fretboard.
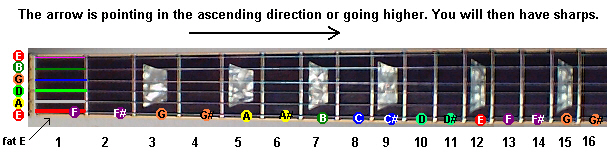
The 12 notes along the Low E string are: E F F# G G# A A# B C C# D D#
We will illustrate these notes and their placement on the Low E string. Looking at the fretboard below, notice the 6 notes to the left of the guitar fretboard. These 6 notes represent the 6 strings used on the guitar. These six strings when tuned, will be the Low E string, A string, D string, G string, B string and the high E string.
Look at the image of the guitar fretboard above and notice the E note. This E note will represent the Low E string when played open. If you picked the Low E string with out fretting any note, you would be playing the E tone. Of course to create this E note, your guitar would have to have the proper tuning.
If you were to fret or push down on the Low E string on the first fret, you would be playing the F note. The next note on the Low E string 2nd fret is the F# note. This is the (sharp symbol #). To get a sharp note, we would move 1/2 step above the previous note. 1/2 step on the guitar would be 1 fret. The E note will never be sharp. Look above and notice there is no E# note.
As we move along the Low E string, we reach the G note. Look below and find the G note at the 3rd fret. As we move up 1/2 step or 1 fret on the low E string we will reach the G# note, 4th fret.
Moving along the Low E string we reach the A note at the 5th fret. Moving to the next fret we have the A# note.
At the 7th fret, we run into the B note. Find that B note and notice there is no B sharp note. You will never have a B# note. We will learn more about this when we construct the major scales in that chapter.
The next note at the 8th fret will be the C note. Then we would have the C#, D D# and finally back to the E note again. I say again because on the guitar, every note repeats after 12 frets. To prove this, look at the G note on the 3rd fret, you will find the G note repeated at the 15th fret, 12 frets away from the 1st G note.
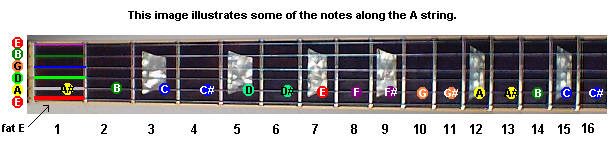
You can figure out each note on each of the six strings using the same process as we did above. The image below will now show you how to find the notes on the A string. Look at the image below. The first note will be the open A string in yellow. The next note on the A string 1st fret will be the A# note. Each note is figured out the same way we did on the Low E string. Notice there is no B# or E#. There will never be a sharp for these two notes. Notice that the A note is repeated after 12 frets. All the notes would repeat after 12 frets, this goes for every note, scale and chord.
The image below shows all of the notes of the fretboard ascending. The first homework assignment will ask you to fill in all the notes of the guitar fretboard ascending. It has already been done for you, but it is a good idea to fill in the blank illustrations on lesson 1. This will be a great help in learning all the notes of the guitar and their placement. Use the illustration below to help out. Then try to fill in one of the illustrations from memory.

Look at the image below. This image has all the notes of the guitar, but the A notes are circled. Notice that some A notes have different colors. Playing each A note and its particular color will sound the same tone. The yellow and green colored A notes are at a lower octave than the yellow and blue A's. The yellow and blue A's are at a lower octave than the yellow and orange A's. Play each A on the fretboard and compare to each other. Remember your guitar needs to be in tune and you will find audio files to help you tune your guitar.
This illustration will eventually become second nature.
| It may help to make a copy of this illustration to complete your first homework assignment. | |
| Back to lesson 1 |
Good luck,
From the Jam Room